Sunday, November 15, 2015

Design Your Own Foil Boat

The Challenge:
Design your very own foil boat and see if it will float!

Materials:

- Aluminum foil
- Drinking straws
- Scissors
- Pennies


Instructions:
1. Brainstorm: Draw out a few ideas, and look at pictures of boats for inspiration.
2. Build: Use your creativity to make a boat out of the materials you have. You can do it!
3. Test - With a parent’s supervision, put your boat in a container full of water to see if it floats.
4. Try Again - If the water didn’t float your boat, try a different design. Keep on experimenting!
5. If your boat floats, try putting a penny inside to add more weight.
6. Keep adding pennies until it can’t float anymore.
7. Write down how many pennies it holds, and see how many pennies different designs can support.

So How do Boats Float?
Think about what happens when you get into a full bathtub-- the water level rises.
When you (or a boat) get into the water, you push down on the water, and the water pushes back.
If there is enough force in the water pushing back, then the boat floats!
The force of you pushing down on the water is from gravity, which is what makes us fall back down to earth when we jump in the air.
The force of the water pushing back is called the buoyant force.

Happy boating!


Boat image: http://boatsafe.com

Friday, November 6, 2015

Candy Corn Science

Materials
  • 10 pieces of candy corn
  • Small glass bowls
  • Liquids
    • Water
    • Vegetable oil
    • Vinegar

Instructions
  1. Form a hypothesis: what do you think might happen when you put the candy corn in each of these liquids?
    1. Here are some things to consider:
      1. Will the candy float or sink?
      2. Will the candy change color?
      3. Will the candy dissolve?
  2. Pour ¼ of a cup of each liquid into a separate bowl or glass.
  3. Carefully add two pieces of candy to each container of liquid - making sure not to splash.
    1. After this step, you should have two pieces of candy left over. Keep them away from the liquids!
  4. Observe what happens to the candy in each liquid 10 minutes, 15 minutes, and 1 hour after you put the candy in the liquid.
  5. Remove the candy from the liquids. Compare them to each other as well as to candy that was not placed in one of the liquids. What changes do you see? Do they match the hypothesis you made in step 1?

Understanding what happened
The candy reacted differently to some liquids than others because the liquids have different levels of acidity.

Some liquids are more “acidic” than other liquids. A liquid that is very acidic can dissolve things faster than other liquids. That’s why some of the candies dissolved more easily than others. They were in more acidic liquids!

Sunday, November 1, 2015

Making a Marshmallow Catapult

Materials:
1.      Skewers
2.      Rubber band
3.      Masking tape
4.      Plastic spoon
5.      Large marshmallow
Procedures:
1.      Form a triangle as the base by using 3 marshmallow and 3 skewers
2.      Use 3 more skewers and 3 more marshmallows to create a pyramid
3.      Use the masking tape to secure the plastic spoon on a skewer
4.      Take the rubber band and make a loop around the topmost marshmallow
5.      Insert your spoon skewer into the base of the marshmallow and also through the rubber band loop.
6.      You can play with this after you construct it, but it is advised to be fragile with the device. For an even stronger catapult, you can wait overnight for the marshmallows to harden, so your device will not break so quickly.
The Science Behind It:
Projectile motion:
- Whether you’re throwing a football or baseball up in the air, all these objects will undergo projectile motion. Projectile motion of an object means that the object will travel in a curved path only under the act of gravity. Gravity is the downward force that keeps everything on the ground, and objects would fall at a rate of 9.8 m/s2. The curved path is a mathematical type of curve called a parabola, which is a symmetric curve. This means that the trip downward for a projectile is a mirror image of the trip up. For you to launch the farthest distance, it is advised to launch at a 45 degree angle.
Energy:
- Elastic potential energy: Think of a time when you pulled a rubber band. The rubber band was very stretchy and elastic. As you pull harder, there is more tension in your rubber band. When there is more tension, there is more elastic potential energy involved. In the case of the catapult, you are pulling the rubber band back to gain enough energy for the launch to occur.
- Kinetic energy: When you are walking or running, you are in motion. In order for this motion to occur, you need kinetic energy. Kinetic energy is the energy that is associated with motion. When the projectile is flying through the air, it starts to gain kinetic energy since it is moving in the air. There was a conversion of energy from the elastic potential energy of the rubber band to kinetic energy.  
- Gravitational potential energy: Have you had a time in which you were on a huge roller coaster? Well, at the highest point on your roller coaster ride, you would have the maximum gravitational potential energy. Gravitational potential energy is the energy that is related to an object’s position. With the catapult, when the projectile is at the highest point of its motion, it has the highest GPE. After gaining that GPE, the energy converts back to kinetic energy when it falls back down to the ground.
Reference:

Wednesday, October 21, 2015

Fantastic Foamy Fountain Experiment

Materials:
1 empty 16 ounce soda bottle
1/2 cup 20-volume hydrogen peroxide
1 Teaspoon (packet) of yeast
3 Tablespoons of warm water
Liquid dish detergent
Food coloring bottle
Styrofoam cup
Funnel
Foil cake pan or lunch tray
Safety goggles


Procedure:
  1. Put on your safety goggles and ask an adult to help pour out 1/2 cup of hydrogen peroxide into the empty soda bottle. Hydrogen peroxide can irritate the eyes and skin so use with caution. Use a funnel if needed.
  2. Add 8 drops of food coloring to the soda bottle.
  3. Add approximately 1 tablespoon of the liquid dish detergent to the soda bottle. Swish the bottle to stir the contents.
  4. In the Styrofoam cup, mix the warm water and the packet of yeast for 30 seconds.  
  5. Put the soda bottle right side up on the foil cake pan. Make sure it is centered. Put the funnel in the opening of the bottle.
  6. Pour the contents of the Styrofoam cup into the soda bottle and swiftly take off the funnel from the soda bottle.


What Happened:
The fantastic foamy fountain is due to a chemical reaction. The hydrogen peroxide and water are called the reactants in the chemical reaction and cause the foamy sensation. The yeast is called a catalyst because it is added in order to make the reaction go faster. In order for a reaction to occur, the reactants must reach a certain energy level in order to proceed. This energy level is called the activation energy. In order to make a reaction go faster, some substances called catalysts, help lower the activation energy in order for the reactants to reach the activation energy quicker. Other ways to make a reaction go faster are by heating the reactants or increasing the pressure of the reactants.
 
For more information on this experiment as well as other really cool experiments, visit: https://sciencebob.com/fantastic-foamy-fountain/

Monday, April 13, 2015

Make your own Grabber Arm!

Got something that's just out or reach? Now you can make a grabber arm that can help you retrieve things!

IMG_1022.JPG

Materials:
  • 8 craft sticks
  • 2 milkshake straws, cut into quarters
  • 2 skewers
  • Tape
Optional:
  • Pipe cleaners
  • Rubber bands
  • 2 cups
Procedure:
1. Create the four beams by sticking a craft stick into the straw pieces are each end leaving a small gap in the straw between the two craft sticks.
2. Break off a small piece of skewer and tape it at the edge of each straw piece in order to help reinforce them.
3. Attach two of the beams together by sticking the pointed end of the skewer into the straw pieces in the beams. Do this for both pairs of beams.
4. Put more straw pieces on the end of the one side of the "X" created by the attached beams for both sets.
5. Line up the upper and lower parts of the beam so that the newly attached straws overlap and stick a skewer piece though the straw pieces. Use tape and skewer pieces to reinforce as necessary.
6. Design the grabber claw. This can be more pieces of crafts stick, bent pipe cleaners, rubber bands or anything else you can think of that will help you pick up an item.
7. Test your grabber by trying to pick up the cups.

Engineering involved: This grabber is a simple machine that serves to show the importance of design. While the basics remain the same, this grabber can be customized to pick up different types of objects with different types of claws. Just like any good machinery, it can be redesigned for the optimal effect, whether it needs to be able to hook into something or have a better grip using the rubber bands. And just like a real engineer, it's up to you to experiment and figure out the best way of completing a task. Good luck and happy testing!

For more pictures and information go to: http://www.instructables.com/id/Extending-Grabber/?ALLSTEPS


Friday, April 10, 2015

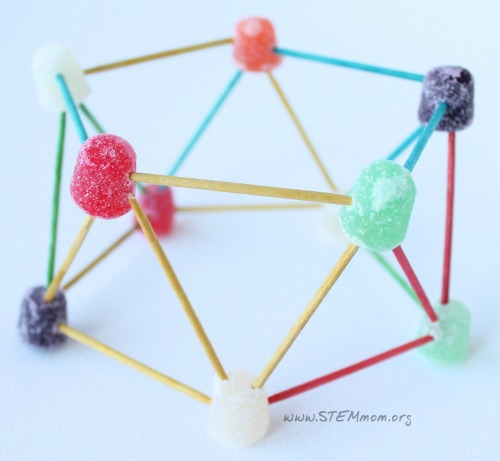
Gumdrop Structure Challenge!

The challenge: Using only 20 toothpicks and 10 gumdrops, design a structure that can support the weight of a textbook.

Materials needed:
-20 toothpicks
-10 gumdrops
-newspaper or something to keep table surface clean

Further challenges (optional):
-A time limit
-A minimum height the textbook needs to be off the table

The Science:
Hopefully, after completing the challenge, you can see several scientific and engineering connections to this activity. First of all, we can see that triangles are STRONG. This is why many bridges around the world are made out of triangles. Next, we also learned that larger bases mean more support and therefore, the structure can hold more weight.

Tuesday, April 7, 2015

Invisible Ink!!!

Ever want to create a top secret message??? Well now you can! And you can use science to do it!

Enjoying using chemistry and the following readily available kitchen items to send secret messages to your buddies!

Here's what you need to get started:
baking soda
paper
water
paint brush (or you can use your finger)
measuring cup
purple grape juice concentrate


Directions:
Mix water and baking soda in a bowl in equal quantities. Be sure to use your measuring cup here.

Then use a paint brush or your finger to paint on your top secret message to paper.
Note: you won't be able to see what you are writing! That's what makes it top secret!

Allow message to dry.

Next, to have your secret messaged reveled paint over you message with grape juice.

YOUR MESSAGE WILL MAGICALLY APPEAR!

Well, not exactly magically... 

Here is what happened:

The baking soda and water mixture you used to paint on your message constitutes a weak base.  Weak bases have high pH values and do not ionize fully.  Grape juice is an acid.  The message is written in a weak base, and this weak base neutralizes the acid in the grape juice, therefore, revealing your message! 

Enjoy sending secret messages!